Wednesday, 12 November 2014

Study Task 2 - Animating Skills

For this task, I had to create five animations, using scenes that were already created for our group, that showed my understanding of the tasks, these were:

+ Turntable - use camera animation in Maya.
+ Pendulum - needs to have an ease in and out.
+ Overlapping action - showing a continuation of animation when the object has stopped - secondary animation - use the swinging pendulum.
+ Bouncy Balls - example of squash and stretch -  use of portraying different materials, how would these react if dropped from a height?
+ Anticipation - showing the momentum before the main action - use the ball scene to create this theme.


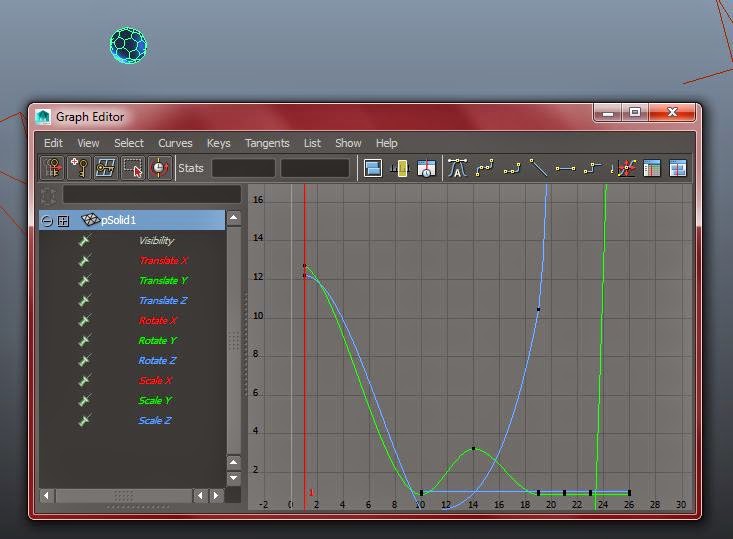
I found animating the swinging pendulum the most difficult to achieve due to creating a smooth follow of the overlapping action. At first I planned out the key frames much like if I was animating a pendulum, and then worked on the animation of the individual segments of the pendulum.  I found that getting the curve of the individual segments the most difficult, and showing the following animation of each part, each needed to follow at a different time. I found that using the Graph editor and moving the graph for each segment slightly behind one another worked, however when I changed some of the rotation of the segments to make it more contoured, the animation went fast and rotated the whole pendulum. I realised that I had chosen the wrong control on the graph and to solve the problem I had encountered, I had to move the tangents slightly and move the particular segment I had altered back to its original place on the graph. 


Animating the pendulum was easy compared to the swinging pendulum as it only involved animating the whole object. As the pendulum swings to a stop, I wanted to show the ease out of the momentum which I achieved by adding less key frames to make the movement slower. I could have also edited the movement by adding ease in and out tangents with the graph editor. 


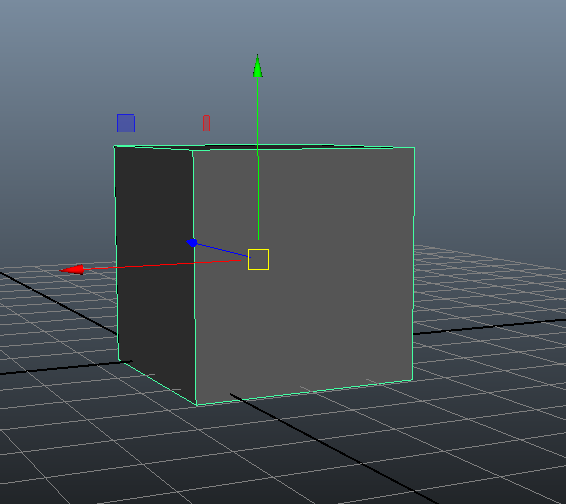
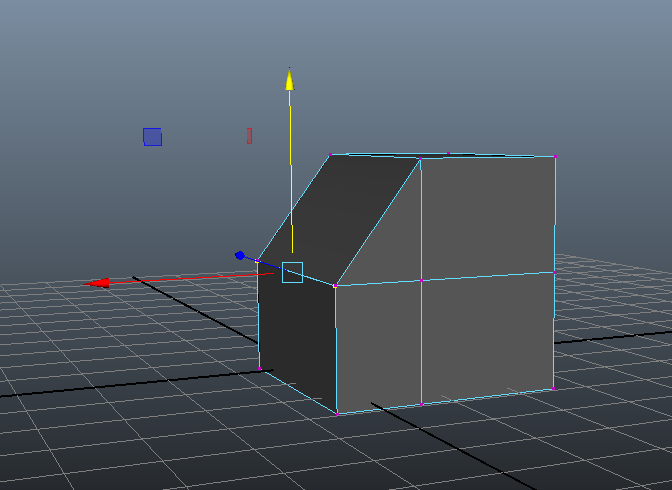
For the squash and stretch, I wanted to show a normal bounce and one made from a completely different material that is dropped and is squashed from the collision with the ground. I achieved the squash and stretch by using the non linear deformer 'squash'. This created a handle in which I was able to squash and stretch the polygon, allowing me to animate with key frames.


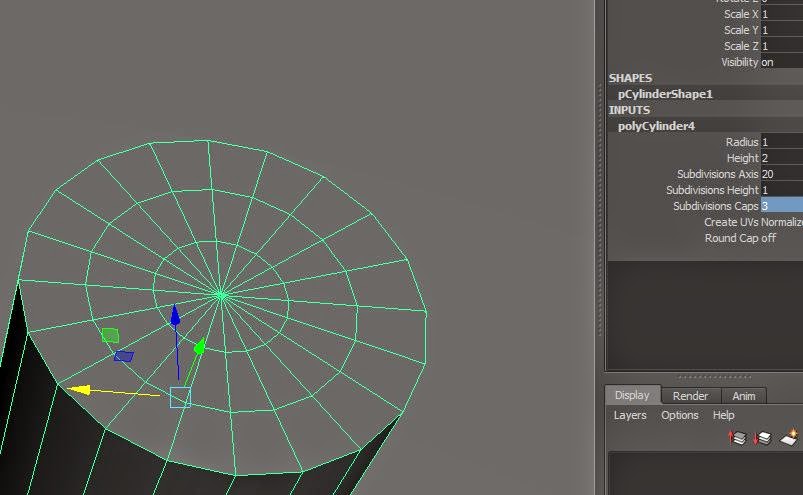
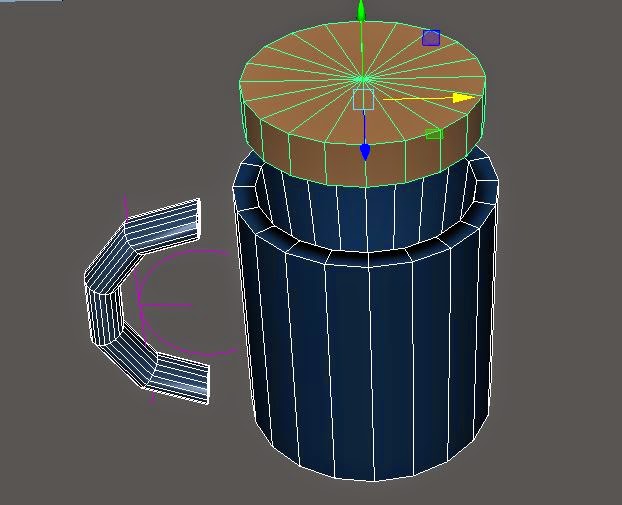
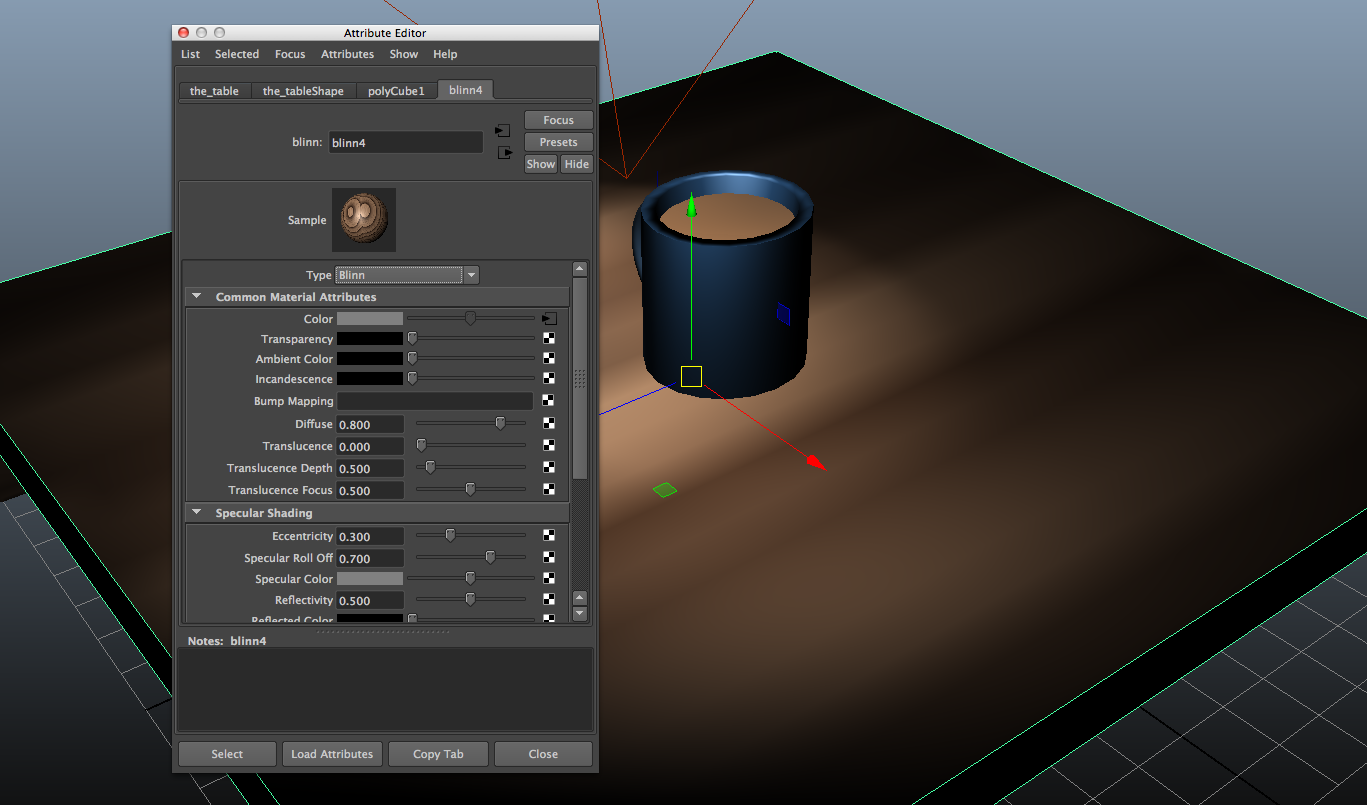
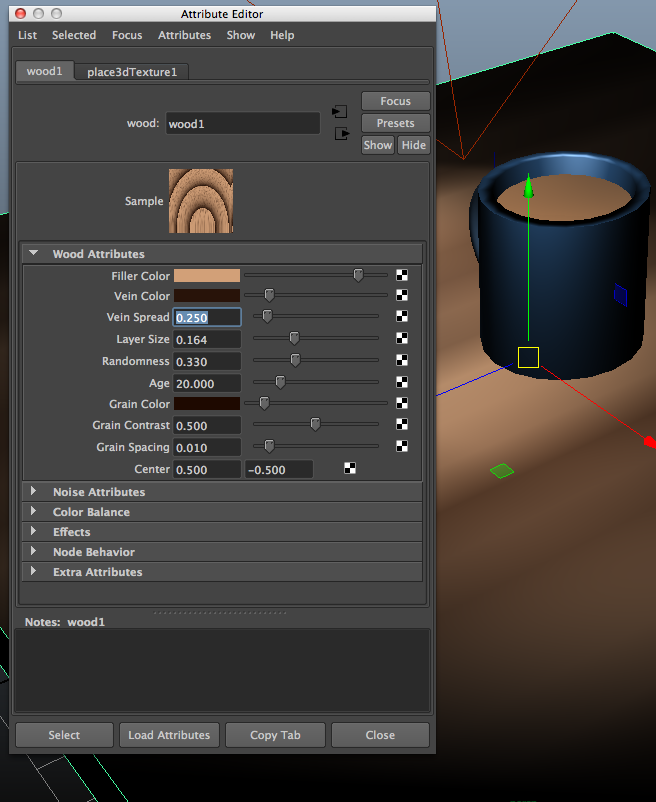
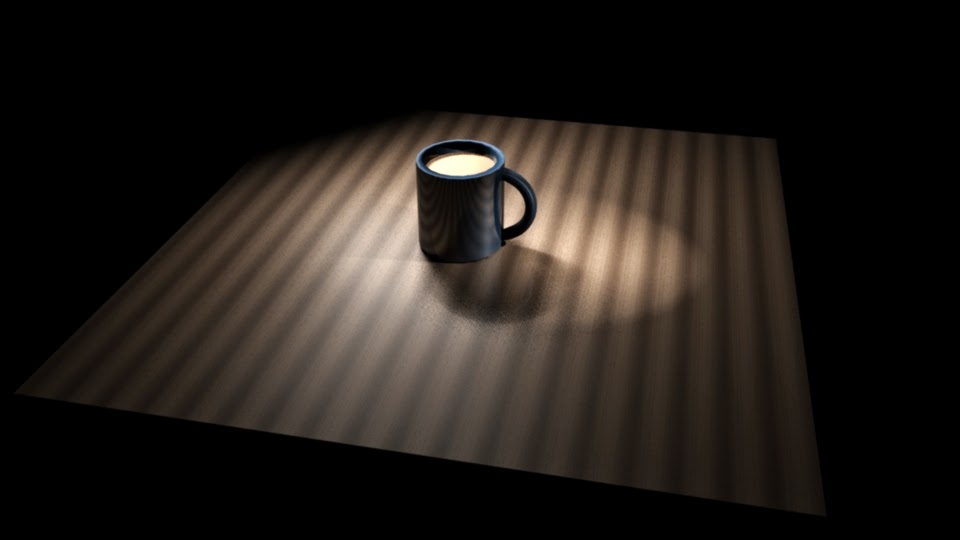
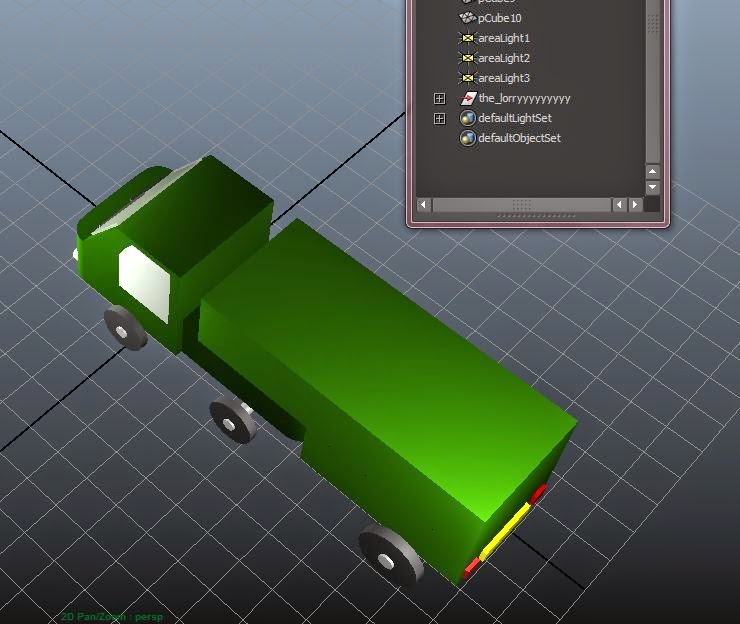
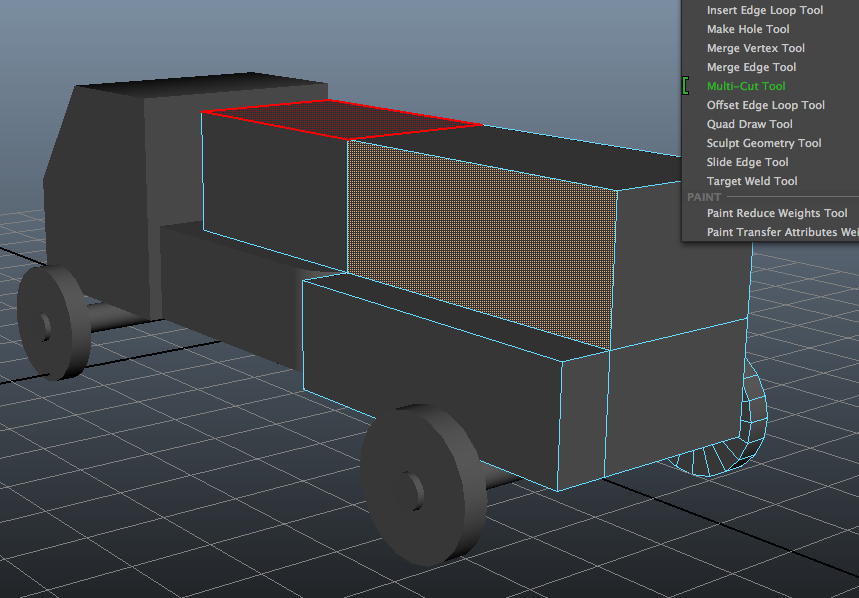
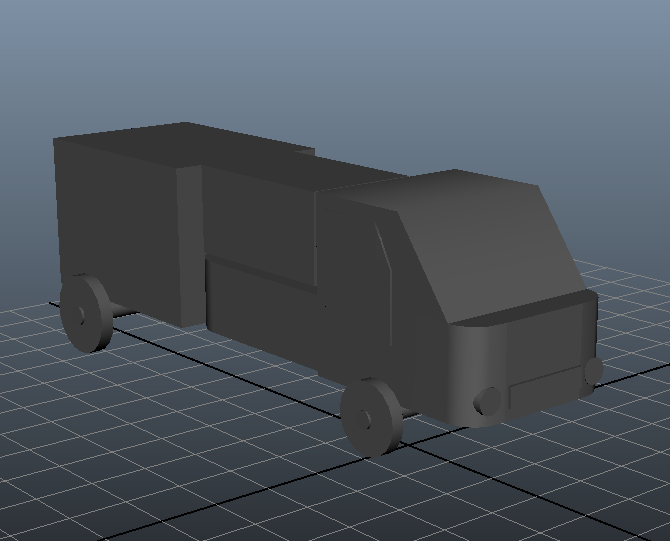
The turntable was by far the easiest theme to animate as all I had to animate is the camera rather than the model itself. I found that the easiest way to animate the camera for the turntable, is to use Maya's preset and focus the turntable on something that the model is standing on, rather than the model itself. Focusing the turntable on the model doesn't make the camera rotate as smoothly around the frame, it doesn't contain all of the model as well as focusing on the stand that the model is on. For the turntable I used a model that I would be using more of in my acting up animation. 


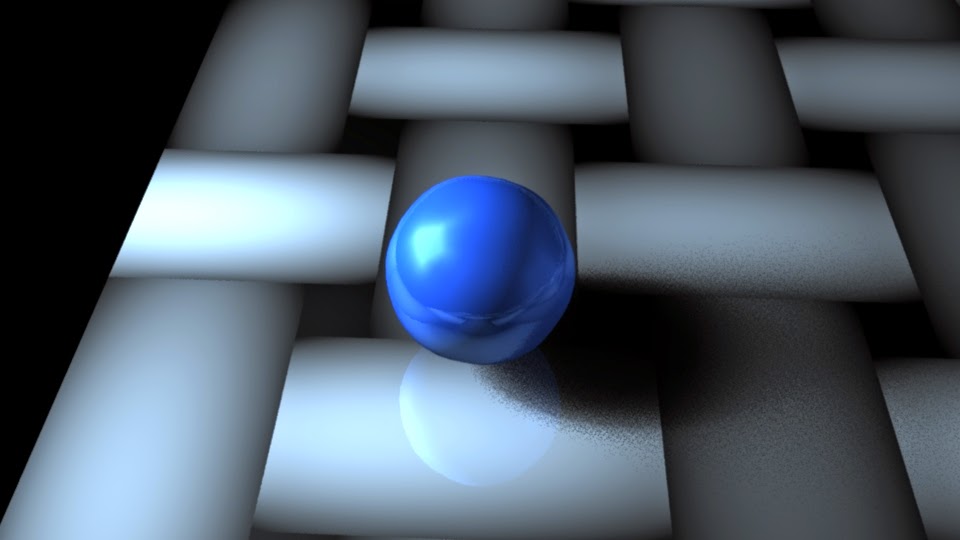
To make the anticipation, I needed to show momentum before the main action that I would be animating. I used the main model shape from the squash and stretch theme, using a squash and stretch use of animation to show the ball bounce off the frame. I made the anticipation before the bounce slower than normal as to emphasize the kinetic energy behind the movement. I achieved the motion blur through the render settings, which I believed helped to show the momentum from the anticipation.


Friday, 7 November 2014

Interim Crit

The Interim Crit helped me with sorting out my performance and my animatic. I recorded more performance footage as the previous recording was extremely pixellated and incredibly small, so recording the key frames again really helped with my storyboards and animatic. I wasn't sure whether or not my performance was not exaggerated enough as the whole module is focused on the animation, and through feedback the movements were exaggerated but still have room to emphasise the poses with squash and stretch. I feel like the facial expressions are key for this animation as well as, and through study task 3 I was able to create fun and dramatic faces which really helped me when thinking about movement and how Moom, and Mother Moom would react.

The feedback from the interim crit helped me to visualise what the background could be like for the animation, in my animatic I left the space plain with a light blue hue with ideas of using image planes for the backgrounds, which could consist of a bright and colourful scenery however I wasn't sure if the 2D image would work well with Moom with him being 3D. I considered possible making parts of the image 3D, for instance have a few shelfs and tables emit from the scenery to tie it in, I need to experiment with this. Another idea from feedback for backgrounds could possibly be using simple Maya shapes to create a wall with a window or something similar with a colour scheme that could fit a toy shop like atmosphere. I also need to consider the lighting, how dramatic if any or how soft the atmosphere needs to be.

Through feedback, I found that a potential problem could possibly be copying the movement of the film from which I chose the lyrics from, Nightmare Before Christmas, as the characters in the stop motion film have extremely exaggerated movements to match the bizarre personalities and appearances of each character. I feel that I can avoid this by ensuring that I use my own reference when animating Moom, and sticking to the scenario I have created in the storyboards.

Tuesday, 4 November 2014

Animatic and Audio

To make the animatic, I used after effects to put the imagery together and change the duration of how long each of the images would be shown as I recorded the audio. I found that recording the audio as I watched the timing of the images in after effects, helped me to visualise how the sound would work with Mooms movements with in the possible motion of the animatic. I changed the duration of each image to last longer for time for the movement to play out with the audio that had been recorded. With this length of time, it gave me a good idea of how long the final animation would be, with room for extra movement or added background sounds.

I created the final animatic using premiere. I chose to use premiere as it allows you to easily edit both the audio and the image sequence that I had created for the animatic. I could also easily switch to soundbooth from Premiere to edit the audio by reducing noise or adjusting the pitch. I recorded the audio using audacity as it allowed me to export the audio as either an mp3 or wav file which I needed to import to both premiere and maya.

Monday, 3 November 2014

Responsive - picking apart a brief

After we had made lists with the whole group in which we understood what we aim to achieve from this module, we moved to looking at previous briefs that had been entered into a student competition, we were given three different briefs to look at, in my case the Morrison brief. We were asked to find the problems with this brief.

The Morrison brief asked for a new shopping experience that would introduce new technology to draw in the new generation, aimed at teens and students, but also keeping in mind not to alienate the target audience that they already have. Already the problem with this brief was the introduction of new technology to bring in a whole new target audience, the problem with this new technology is that it will alienate the target consumers that they already have.

From the three different briefs the whole group were given we made general points that affected each of the briefs:

Proposal - what does the brief want you to do?
+ Produce a Product
+ Visual Concept
+ Persuade through a campaign

Achieve - what the outcome need to be able to do
+ Publicise their Brand
+ Expand their audience
+ Return Customers
+ Attract Kids
+Edge over competition
+ More customers

Problem - What is wrong with the brief?
+ People don't know about us!
+ Multiple Audiences (we don't know who they are)
+ Fun not serious
+ We don't know what we want!
+ Pretty but Pragmatic
+ We are dull and out of date
+ Adding value

When analyzing briefs, these points will help me to understand what the brief specifically wants, be aware of any problems in the brief and create an outcome that would work well for the client and their audiences.  For example in the Morrison brief, they wanted to attract a new generation of consumers, in hopes of this generation they want new technology to attract them, however the constant audience for Morrisons will not want a complicated shopping trip that involves the state of the art technology to help their shopping experience. This will most likely result in losing this target market. The brief also states that it wants to be fun and not serious, however when you do go shopping you just want to buy the food you need, you don't go there for fun.


Sunday, 2 November 2014

Audio inspiration

I found it hard trying to come up with different accents and pitches of tone for the audio track for the acting up animation, I wasn't sure how to start with accents. I found a clip on youtube with the comedian, Jimmy Carr, showing how he puts on an accent by repeating a few words, in this case 'Geordie' accent. It was really amusing and interesting to see how he uses these words to start the accent and be able to continue with it. I wanted to be able to use this technique, however the accent I want needs to be child like to fit the narrative of my storyboard.


The Amazing World of Gumball inspired me through both the main protagonists voices, as both were childlike and boyish for their characters. I mainly focused on trying to imitate the voice for Darwin, as I felt his voice would be easier to learn and adapt than Gumballs, due to the pitch of his voice. Using the technique that Jimmy Carr uses, I used the words 'I know' and after awhile, I was able to use my own version of Darwins voice, which I ended up using for my animation. Through feedback, both peers and interim crit say that my voice for the animation fits the childish voice that I was going for and sounds slightly american with a few of the words that I pronounce in the dialogue.


Gravity Falls and The Grim Adventures of Billy and Mandy also inspired me for the child like voice I wanted for Moom in my narrative. I was inspired by one of the main characters Mabel, from Gravity Falls, through her tone of voice, however I managed to slightly copy her accent but when I related it to the animatic that I had made, I felt that Moom would be better as a boy, through the appearance and the objects that he interacts with. The Grim Adventures of Billy and Mandy inspired me through one of the main characters Billy, however his voice was very difficult to try and copy for full dialogue. I liked how the voice actor, Richard Steven Horvitz, would purposely hold onto the end of a word, such as "Helloooooooooooooooooooo" and I quite liked how that could be used with emphasis on the animation with in my acting up module.


Saturday, 1 November 2014

Animating in Maya - using deformers

Using deformers to change the appearance of a polygon, help to make exaggerated poses and movements of the shape when animated. For example, when animating a ball, you emphasise the squash and stretch of the bounce to show the weight and volume of the ball, is it made of concrete or clay?, these deformers help to get the right amount of squash and stretch without having to mold the shape multiple times. I found that after adding a deformer to your polygon, you can change the position of the handle, changing the pivot point in which the deformer will deform from. Using this I was able to create smooth curves and shapes when modelling and animating for study task 2. I found that when manipulating the value of these deformers, using the middle button helps to keep the change in proportion.

Flare
Twist

Bend

Example of the handle


Key framing the deformers on the polygons was a struggle at first through how I could only seem to manipulate one deformer at a time and then keep key framing the changes of each deformer. If I moved the object using the translate tool, I found that it would effect the deformer rather than moving the shape. I found two solutions to this problem, one of which being to animate the main movement of the object without using the deformers and then add them, or freeze modifications of the polygon if I was happy with the deformer properties, and then translate the object.

I also found that not using the auto key tool helped with smoother inbetweens between the different changes on the square. I attempted to change the speed on the graph editor as the animation was speeding through the playblast, however every time I curved or made part of the graph linear it would affect the rotation of the deformer on a different key frame. 

Sunday, 26 October 2014

Making a Mug in Maya

To create the main body of the mug, I first needed to create a cylinder polygon and add 3 subdivisions to the top circular face, subdivision caps. Subdivisions of a polygon are vital for deforming and manipulating the object. I then moved on to right clicking on the cylinder and choosing the face, I was able to select the centre faces and move these down with the translate tool. I only chose the centre faces so the rim of the mug could be made, the subdivision circle of faces that was next to the centre faces would be dragged down as well, leaving the last subdivision to be the rim.

Adding subdivisions
Moving the centre faces down to create the inside of the mug
To create the handle I used another cylinder polygon, creating more subdivisions and using the non linear deformer - bend. You can control the point of the bend by moving the handle, and by holding down the middle button you can manipulate the curvature of the cylinder, how much you want it to bend. I then smoothed the cylinder by using the shortcut '3' and '2' to view the smooth and the wireframes, '1' to revert back to normal. In addition you can view just the wire frame with '4', put the shading back on with '5' and '6' shows the textures and '7' turns on the lighting and shadows.

Using the non linear bend deformer to create the handle
Parts of the mug
I added colour by selecting and right clicking on the polygon and choosing assign new material, and then choosing shader from the menu. You can also click on the render shelf and choose the premade shaders from there. On the attributes menu, you can change the colour or add a texture to the polygon. I added the texture by clicking the checkered box next to the colour slider, and chose the texture from the menu that followed. I chose the wood texture for the table and was able to change the size and thickness of the grains through the attributes menu. 


Adding a texture
Changing the grain of the wood
I then added lights to the composition by going onto the rendering shelf and choosing the spot light and area light. To see the effects of the light I used the shortcut '7' to see how the light would effect the scene. With the lights you can also use the translate, scale and rotate tools, to effect it and in the attributes menu you can change the colour, feather and intensity of the light. For example you can change the penumbra angle, increasing or decreasing the area of light, and using the dropoff scroll you can feather the light.

Adding lights
Final rendered image

Study task 1 - Do it yourself

For the second part of the first study task I had to create another simple object using the skills that we had learned so far. I decided to make an apple through its simple contours and structure, or so I thought. I originally made the apple from a sphere shape and moved the most central faces of the top and bottom of the sphere inwards, to create the dips with in the apple, and slightly contoured the edges of the main body of the sphere by manipulating the edges, in which I gained a simple apple shape.
However I wanted to try and make the body slightly squarer and less round, to match a more cartoony style so I decided to experiment with both making the apple from a sphere and a cube shape. I found that using the 'insert edge loops' to a polygon makes it easier to create a contour, after I added these I then used the face selection to translate parts of the object.
Creating the apple using a sphere, made it easier to make the top and the bottom of the apple, however I tried to manipulate the faces on the body of the sphere by adding endless amounts of edge loops and I could not stop some parts of the apple looking pointed. I deleted a few vertex points, thinking it could possibly make the side smoother much like when you delete points from the pen tool path in photoshop however this left gaps in the shape and did not solve the problem.

Making the apple from a sphere shape - selecting faces and moving
the faces down with the translate tool


Another apple attempt with a sphere polygon - rotating the edges
to gain a smoother curve

Creating the apple shape from a square - selecting faces to decrease in size
I found that trying to make the apple from a square I was starting to create a contoured yet spare body, however I couldn't create a rounded top or bottom of the apple well enough. I tried to bend and rotate some of the edges and faces but I still could not make the surface more rounded. I considered using a cylindrical polygon, however after making a mug in Maya I knew that I would not get a smooth connection between the circular top and bottom of the cylinder with the main body. 


Evolution of the apple - the previous attempts and the final apple
I finally created my apple shape by only manipulating the top and bottom of the sphere and slightly moving these faces down to keep the apple contoured and I managed to make the apple look slightly cartoony with the colour addition. In the colour attributes, I changed the spectral colour to a light green which contrasted well with the apple. I added shadows to the apple by using the render, Mental Ray, this render shows the highlights, reflectivity and shadows of the object in its surroundings.

Final rendered apple

Responsive - How to choose a brief

Analysing the brief is crucial as the brief needs to be able to complement your discipline and bring the best out of your individual skill set. There is no point in choosing a brief that asks for something that is not challenging or creative which can help you gain experience towards what professional practice you want to achieve in the future.

Individually we created 10 points in which we want from the brief, my main points that I want out this module briefs are:

+ Time management
+ Experience against narrow and live deadlines (absolute)
+ To be able to animate to a fast yet good quality of work
+ Working with a clients specific criteria
+ Develop my skill set towards storyboarding and character design
+ Use different/merge styles of animation to create the final product
+ Complete a competition brief that will suit and advance my skill set
+ Try to take a different approach to the specifications given (think outside the box)
+ Networking
+ Working towards professional work in industry

After we created our own individual lists, we then went into groups of four and created another list with the other groups collectively:

+ Broaden your approaches - think about media, narrative and atmosphere of the piece.
+ Win Stuff!
+ Professional Feedback - A good opportunity to improve your practice through experienced professionals, gain tips and knowledge in the industry and towards your own work.
+ Networking opportunities - A chance to build early bonds in your practice industry, help towards obtaining more client work or even getting recognition by specific studios. 
+ Confidence - Gaining confidence in your own work, confidence in approaches of work and towards networking skills.
+ Workload Management - Early practice in juggling multiple client based/ live briefs, ensuring that everything is handed in on time and organised.+ Working to deadlines - Practice for absolute deadlines
+ Experience - The more competitions/briefs that you take on, you gain experience from any mistakes or from feedback. Always room for growth in your practice.
+ Locating your practice - Understand what you want to do in practice, a taste in different practices with in industry.

Looking at the brief that the whole group created it made me realise how much the brief that I would soon choose can aid my work and improve as an animator, the experience I would gain from live clients would help me in the future, with any mistakes or even how to handle clients specifications.
In this whole list the networking and locating your practice points stand out to me the most through how I know myself that these are points that I immediately need to improve and gain experience of, to be able to survive in the practice that I want to be able to work in when I leave university. The practices that I want to aim for are character designing, storyboarding and game animation with in cut scenes. In my opinion, I feel like these points can easily be merged together with in a single practice, and each can compliment the other.

From this, in our individual groups, we created another list responding to the whole group list:

+ Draw or Animate faster
+ You Can Win
+ Will get feedback that will help us improve our work
+ At awards can meet other students and business clients - networking
+ Absolute deadlines
+ Live briefs force us to converse with clients
+ Forces us to be organised
+ Gain experience from just doing the work
+ Confirming the industry practice in which you want to do
+ Gain confidence from submitting work and with networking

I felt like this list was more of what we will get out of this brief by the end of the module, in which I believe are all valuable points and experience for the third year and also after university/with in a working practice.

Saturday, 25 October 2014

Keep on Truckin' - adding colour

When adding colour in Maya, there are already premade shades, Blinn, Phong, PhongE and Lambert, from these you can edit the colour, light and texture of the polygon. However I learned to always assign a new shader to the polygon, as it is easier to edit and change textures.

There are a few ways to add colour to the selected polygon, such as:

+ Using Hypershade - Hypershade allows you to save shaders that you have made and apply to more than one polygon at once.

+ Assign new material - by right clicking on the polygon, you can choose a shader and then in the attributes menu you can change the colour. You can also select a texture for the polygon by clicking on the checked box next to the colour scroll. Depending on which basic shader that you use for the polygon, it will create a basic shine to the object. I found that by adding a contrasting colour for the spectral colour helps to make the polygon look as if it has been stylized with a cartoony or painted appearance.
Colour attributes
 Adding textures - much like the colour menus - I found adding textures more complicated due to how it was difficult to see the texture without rendering it first, and moving the texture to better suit the polygon still seems like an impossible task. I did experiment however with the mountain texture for the terrain and realised that I could change the rotation of the texture on the second tab on the attribute menu.

I found that you could also add your own files for textures as well as, however I have yet to be able to change the size of the texture with in the polygon, as a solution to this problem, I created another cube shape in which I added to the lorry and then merged this with the side of the lorry.

Lorry - Coloured

Final rendered image


Study Task 1 - Keep on Truckin'

For the first study task, I had to create a simple lorry shape and another simple object. I found that I mainly relied on the three main tools in Maya to model, the translate, size and rotation functions. Using these functions on the edges and faces of the primitive polygons allowed me to create a lorry and other simple shapes. In order to create a contoured edge, the use of edge loops, helped to create a slant and change the appearance of the original polygon.

Main manipulators of polygon
By moving the edge loop you can create more edges with in the polygon
When creating the lorry I found organizing the polygons into groups or parenting the objects, in the outliner window, made it easier to duplicate and move the composition. Parenting polygons - similar to grouping however the 'child' polygons will follow the 'parent' polygon.

Extrude tool - has the effect of creating another polygon from the selected face/
move the face inwards to create a hollow shape.

Basic lorry shape
I experimented more with the lorry by adding lights, license plate, windows and window wipers, to become more confident with using the basic tools for manipulating polygons. I learnt to bevel objects using the mesh drop down, it gave the polygon a smooth curve depending on the curvature.


Thursday, 23 October 2014

Animating in Maya - using the graph editor notes

The graph editor allows you to control the speed of the animation in your current scene. To edit the the graphs, you can select the handles and press the short key 'w' to manipulate it, or alternatively use the middle mouse to move the handles. To keep the movement in the correct proportion, holding shift will allow you to move it with out it moving the key frames to a different position. To be able to manipulate the handles, free the tangent in the tangents menu as well as weighting the handles. The weighted pivots act like a central pivot radius.

To organise the graph editor, delete the other values that are not being used with in the animation. To continue the animation past the actual duration of the key frames, to create a smooth ease in and ease out of the animation, adding 'infinity' to the graph applies this work. I found that it worked well for animations that used the same motion as it moves, such as a ball bouncing across the plane. When animating a ball bouncing, making the point on the graph linear, will make the ball bounce straight back up.

Graph editor
Rendered in Mental ray

Monday, 20 October 2014

Responsive - Overview Notes

A chance to collaborate with other students, focus on certain parts of animation, storyboarding and character design. Choose a set of briefs that suit you.

5A4 - Research content for the brief, audience, visual research, primary and secondary, contextual research - this is at least 1/4 of the module assessment
5B3 - Generation of ideas - concepts - processes, mock up pitch boards and proposal boards, if creating consumer products.
5C3 - Identify briefs - allows you to explore your art discipline.
5D3 - Time management, time it takes to develop a body of work - making the most of your time - quality finished work - resources, workshops - consider live briefs - forces you to make work for a tight schedule, documentation through blog - engaging with other clients - networking, evaluation.
Any other live competitions or collaborations can be included in this.

Identify roles of people - using strengths of each person to create the best work. - Presentations - pitching, something that is marketable - how we can prepare for later working life - something sustainable.

Interim Crit 22/1/2015

Study brief 1 - Individual practice, a minimum of 5 substantial briefs, these can be made up of small commissions or competition works, for example loop de loop, could enter the competition once a week till the module brief ends, these collectively can make 1 substantial brief.
- If you're given a small client based commission, you could build on top of this by designing mock up products, such as, client asks for a birthday card, build on top of this by designing gift wrapping, gift bags, balloons, bunting.
- These 5 need to be significant - could have another 2 for illustration based briefs? Qwertee - design a t-shirt design? could enter the competition once a week to build up a body or work. Good practice for short deadlines.

Project report - evaluation of the module as a whole. - what did you gain from this? how did this effect your working practice - why this specific brief? Read the terms and conditions of the live briefs - agre the work load - any competitions that ask to sign or not blog about it talk with the tutors - Keep copies of your work - mail it to yourself as the postage stamp stands as evidence of date in the court of law. DO NOT OPEN THE PACKAGE - as it will become invalid evidence.

Storyboarding Moom

With the particular lyrics that I had chosen, I felt that from the ideas that I had chosen the idea involving a toy shop would work best with the 'Whats this?' 'I want it for my own' 'there's music everywhere' would work well with a child character within a toy shop looking at the merchandise.
When storyboarding the narrative for the lyrics, I considered the angle and lyric that would be said in that particular frame, I wanted the lyrics to work with the items and surroundings that Moom would be situated in. I considered the exaggerated actions that Moom would make as a child character when interacting with objects, such as spinning or running to the next range of toys, and raising arms in excitement. I also thought about how he would react to certain objects such as delight when seeing soft toys and possibly revolting at the sight of musical toys.

The surroundings for the animation could possibly be in the same style as Pocoyo, a childrens show that was created using 3D software, such as Maya or 3D Max. The style of the animation is simple and minimalistic but fun and engaging through the design of the characters, the objects they interact with and the exaggerated animation. I could use this style and adopt it within a closed space to create the appearance of a shop, in which Moom could possibly burst through the front door.

Pocoyo

I began storyboarding by quickly drawing the first idea that popped into my head, Moom spins around the shop whilst looking at toys in the shop and slips on a banana and crashes into a few of the items. As much as I liked this idea I felt that I could develop this idea further and add some humour into the animation. After jotting a few more ideas down I thought about including a parent in the scene, Mother Moom, who could be a duplicate of Moom but with lipstick. Mother Moom could make a cameo at the end of the animation and tell Moom that he cant have anything.

I decided to go with the idea of Moom being a child, and looking at toys with in a toy shop, and as he prances and spins around the shop, he finds one toy that he really wants and turns to Mother Moom for approval, however he is met with a disappointing 'no'. I felt that the lyrics for "Whats this?" would work really well for the idea, as Moom can question and observe the toys as he looks around, and the rest of the lyrics would work well with props such as a music box and a few toys, with a fun background in which can relate with 'the sights the sounds, they're everywhere and all around' - which would work well with Moom spinning to and from different objects as he explores the space.

Initial ideas
Thumbnail sketches of possible narrative
I then made thumbnail sketches for the narrative that I chose, considering the camera shots that I wanted to include in the animation. I wanted the camera angles to emphasize the emotion that moom would be portraying, for instance moom makes an angry face and to enhance this using an angled camera looking up at his face. I wanted to start the animation with Moom gasping as if he has seen something of interest, a possible zoom in from a medium shot.

Storyboard 1 
Storyboard 2
Storyboard 3
 In the storyboards I tried to consider the exaggerated poses that Moom could possibly have, creating dramatic postures for a normal movement was a challenge but quite fun to draw. I need to keep in mind how well this will translate in the video reference, as some will help to inform the movements that I record however the frame with moom and his mother may have to be changed due to the angle. I believe that having mother moom next to moom as he holds the toy in the air, and having it pan to mother moom as she refuses to buy him anything.


Thursday, 16 October 2014

Ideas and Prop design

I started thinking about the objects that Moom would be interacting with in the animation. As the setting would be in a toy store, I considered what items would work well with the lyrics in the song that I had chosen for the module. The lyrics include "Music in the air" which made me think about incorporating a musical toy, possibly a toy bear that says something when you squeeze the paw or a music box. I felt that a music box would be more appropriate to work with in terms of ideas and how Moom would be able to interact with it, open and close the lid, follow the turn of the doll etc. I also felt that I would be able to possibly create a few funny moments with the music box, such as having Moom close the box as he doesn't like the sound of the music, or winding up the box so the doll spins faster.

I then thought about what else Moom would interact with in the animation; I needed another toy in which Moom would hold up and then turn to his parent to ask for the toy. I wanted this toy to be shown at the beginning in which Moom then turns back for as he has decided what he wants. I decided to use a teddy bear and use a squeak noise when Moom picks the toy up as to add personality to the object. When Moom holds this teddy bear I will need to look into locators as to ensure that the movement of both the object and Moom move smoothly.

I considered how I would define the parent for Moom in the animation, 'Mother Moom'. As I can't change the proportions of Mooms body to exaggerate the waist or legs, I thought about props that would make Moom look like a woman. I felt that adding lips and possibly some eye lashes would work well, I could create these using the 'create polygon tool' , and I add a handbag to the model as to help show that she is Mooms Mother. I thought about the body language that would help give her personality, such as putting her hand on her hips and moving her hip to one side.


Wednesday, 15 October 2014

Comparing lyrics and narrative

Making a lyric mind map, as to compare different songs with what narrative I could possibly have with it, and what accent or tone of voice I could have for the lyrics, helped me to generate ideas for the project.


From the mind map, I found that I could carry on 4 of the songs from this mind map, with chance of more than one narrative and use of body language that can be used for Moom.

+ Boney M 'Rasputin' 
 - Narrative - could simply be Moom dancing along to the song with a fur hat on his head, have the     hat move into the air and onto his head as he moves. - Could act out one of the verses, example "Lover of the Russian queen, they put some poison into his wine, RA RA RASPUTIN, Russia's greatest love machine, He drank it all and he said "I feel fine" Could have Moom sat on a table, legs swinging with a goblet in his hand, gulps down the drink and throws it behind him with a smash of the glass, tastes the wine eyes looking up, then shrugging and jumping up from the table and strutting off with a happy spring in his step.

+ Aha! 'Take on me'
- Narrative - Have Moom dance with the music, move his hands across his face and move his head from side to side. - Could also copy a few of the movements from the music video for the song, for example sat at the cafe and change to black and white with in comic panels?

+ Nightmare Before Christmas 'Kidnap the Sandy Claws'
- Narrative - So Moom kidnapping a santa claus decoration and have Moom sneak around with a sack on his back, tip toe around walls and put his back against the wall to hide from people, could jump into a box or run at certain parts. - Could follow some of the narrative such as "First, we're going to set some bait, inside a nasty trap and wait, when he comes a-sniffing we will, snap the trap and close the gate", with this I would need a few props to go along with the story, depending on how long making props and backgrounds - could be too time consuming.

+ Nightmare Before Christmas 'Whats this?'
- Narrative - Have Moom look into a shop window, happily skips into the shop, and continues to look around the shop, exaggerated arm movements, speaking with his hands, ends with him buying one item. For this narrative I would need a full background and few items that Moom could interact with - possibly make the background in photoshop? could possibly be too time consuming depending on how much time it takes to make props in the Maya software.

Sunday, 12 October 2014

Maya Basics: Initial Notes

+ To create a new project - File, Project window - save the location to desktop as it is easier to organise and transfer to hard drives. Maya will make the folder for you.
+  Ensure that you have a mouse with a wheel button as it is a vital part of using Maya.
+ Go to the panels option - Orthographic and select the facial view which will allow you to change the position of the facial features.
+ Press 'z' to undo
+ To move around the canvas hold down 'alt' and middle click
+ To rotate the canvas view hold down 'alt' and left click
+ To zoom into the canvas hold down 'alt' and right click
+ To fit the canvas into the frame press 'a'
+ To fit the selected object into the frame press 'f'


+ Tool bar (main tools used):
   - Translate tool - Moves the selected object, shortcut 'w'
   - Rotate tool - Rotates the selected object, shortcut 'e'
   - Size tool - Increases and decreases the size of the object, shortcut 'r'
+ Hold down the space bar for the quick menu,

Maya Basics: Meet Moom

Moom is a prepared rig that I need to animate for the brief  'acting up' and to gather the basics of the 3-D software Maya. The Moom model and its rig, are very simple to use, through rotating and moving the joints to change the pose that the model is in, as well as changing the facial expressions via the facial control panel.


To animate in Maya, you need to set the key frames on the timeline, in which it adds the inbetweens for you. I found it was easier to organise the key frames by selecting all of the models rig, once you have finished with the pose, before you set the key frame. This stops any problems in the future with the inbetween frames as the animation plays out. Then you have moved the selected rig, press 's' to place the key frame on the timeline. Only the key frames for the particular rig selected will show on the timeline at once. A small icon on the bottom right corner of the timeline, shaped like a key, 'auto-key', will automatically change the key frame for you as you adjust the rig. To delete key frames right click on the timeline in the location of the key frame and select delete.


To view your progress so far via video, you can make a preview by clicking on the window menu, and selecting the check box next to Playblast or right clicking on the timeline. The preview will show the rig as it is not the fully rendered outcome. Playblasts are an easy way of seeing the progress made so far, without having to wait for the fully rendered outcome, making it more time efficient.


Saturday, 11 October 2014

OUAN504 Character and Narrative - Acting Up

The new brief requires the animation to be 3-D, created in Maya or other 3-D software, in which a pre made rig will be animated along to a recording of a set of lyrics, with at least one prop. As the module is 30 credits, compared to the modules last year which were 20 credits, this module will require a wider breadth of work, including designs and evaluative outlooks on animations and animators.

Module notes:
+ Primary and secondary research, including references, magazines, blogs and books
+ Consider the audience - record the set of lyrics to change the target audience?
+ Problem analysis - show how you overcame any problems, for example animating in maya with the key frames - accidently move the rigging rather than the actual limb - show how you solved this
+ Develop a higher level of skills in recording, responding, presenting and evaluating
+ Evaluations need more context and depth to the structure, maximum of 1000 words, ensure not to use a chronological formation of paragraphs
+ State what technology/software/media works well and why - why is this media appropriate, what does it represent to the audience?
+ 50% of the module is research and development (5A5, 5A6, 5B4)
    - Can consider the use of other 3-D software, what are the differences, how will this help in the production of the animation? Think about how different lyrics will affect the animation, compare a few with ideas of narrative.
    - Given a character to animate, focus on the animation, show and understand the rigging, understand how to model in Maya. Narrative through body language and facial animation, lip syncing, imagine a mime acting out a scenario.
+ Pre production - Production - Post Production
   - Pre production, designing, mind maps, word association, choosing/comparing lyrics, target audience, storyboarding narrative, camera shots, consideration of props.
   - Production, animating the rig
   - Post Production, adding recording, rendering, evaluation


Sunday, 11 May 2014

Final animation


I believe that I have achieved my initial plan for the animation however I had to make a few changes since the layout of the storyboard. The storyboard originally fitted with in a 40 second animatic but if completely animated it would have lasted for longer than 40 seconds as I realised that each section of the storyboard would have at least been 4 to 5 seconds and needed an extra 5 seconds for the animated title at the end of the animation so before I started animating the final animation I knew I had to cut a scene from the animatic. I decided to cut the scene were the character engulfed by a cloak reading from a book should be taken out of the animation as the gate scene would work with transitioning into the girl turning scene, through the movement of zooming into the gate and having the following scene fade in.

I also changed a few scenes in design for example the girl turning should have been with in a portrait on an aged stone wall  however I found it more visually appealing with the landscape to be encased within the silhouette with a black background as to link with the rest of the animation sequence.

I also changed the ending title animation slightly through changing the font of the 'overture' to Times New Roman and having the text fade in. I changed the font as I felt that the script did not match with the animation however it does match with the aesthetics of the comic book, but for my animation it needed something that would like to the font of the text that ran throughout the animation. I felt that this worked better with the fade in animation and the fonts' kerning and tracking were equally spaced as to make the word easier to read.

Overall I enjoyed this project as I experimented with different techniques and processes, rotoscoping and After Effects, in which I became more confident with both and I made a title sequence that matched with the comics audience, mature audience, and the theme of the comic as well.